Saturday, October 2, 2010

Easy Fall Wreath

There are so many different fall wreaths out there and they are all so cute that I had to take a stab at it!  Mine is pretty simple and super easy to do.  I had a grapevine that wreath that I got a while back for next to nothing, a few extra fall leaves and a couple other items left over from my fall topiaries.  I went to Jo-ann's the other day and I bought some ribbon and 5 fall floral accessary picks.
The floral items were already on stems so I just started sticking them into the wreath at different areas and angles to get the look I was going for.  I didnt even have to use glue!  I added some ribbon and made a bow.  When fall is over and I will just pull out the fall floral and add Christmas stuff!

I really had every intention of hanging the wreath on my door outside but I just couldn't do it.  I simply hung it above the mirror!

It only took a few minutes to put everything together and hang up...my kind of project!

Happy Harvesting


Wednesday, September 22, 2010

Halloween Decor- with a little PB Spin

Have you seen the Pottery Barn catalog with all of the Halloween decorations...especially the vase filled skulls with lite candles over the highly flammable moss?  Not to give them a hard time, but I'm convinced the PB design team does NOT have kids!  

Well here is my fireproof and much cheaper version...

I used skulls from the Dollar Store that I darkened up a bit with some acrylic stain and a few bats that I cut out with a cookie cutter out of salt and flour dough and painted them with black acrylic paint (see below.)  I used a flame-less candle that I painted black and added some moss and it was ready!


My boys and I had a fun time making these bats out of dough.  I made a bunch of them and even put some holes in a few to possibly make a banner...that's on my to do list but so we shall see!

Here is all you need for the dough:
1 Cup Salt
2 Cups Flour
1 Cup Water

Just mix all together and knead until smooth.  The dough can be a bit sticky so I just rolled it out with some flour and started cutting out the bats with a cookie cutter.  Place on a cookie sheet and bake in a 200 degree oven until hard (usually 2 to 3 hrs depending on how thick you've made the shapes.)  After they have cooled off I sanded some of the rough edges and then painted them.


Happy Haunting!


Monday, September 20, 2010

Trendy Handbag

It's National Sewing Month...but really everyday can be a sewing day!  They have a contest going on right now and I entered my project.

I just love making handbags...they are easy and I love picking out all the fabrics.  They also make great gifts!  This Simplicity pattern is super cute.
Note the timeless gold Singer beauty in the background!  I don't want to age myself but this is my moms sewing machine that is 30 plus years old.  I'm pretty sure this thing made my childhood wardrobe along with countless other projects.  I want to get my own but for now I borrow Ole' Goldie!  They sure don't make them like they used to...
This is how it turned out...I just LOVE the black and ivory fabric!
A quick pic of the inside...
I made a small ribbon flower corsage (for my corsage tutorial go HERE) and attached a pin clasp so that it can be removed but its the perfect touch to the bag to go with the inside print.

ENJOY and celebrate National Sewing Month!  


Friday, September 17, 2010

Flower Corsage

I'm not too much of a girlie girl but there are times when life calls for a little frill!  Especially after taken care of kids and hanging out in sweats all day.  This is a super easy flower corsage that I made with ribbon that you can attach to just about anything.  You could sew it on to something or use a pin clasp (or in my case just a safety pin since I ran out of pin clasps.)  All you need is some ribbon and some hot glue!  
Excuse my rotary mat...my son decided that it needed his artistic touch a few years ago.

First cut 12 strips at 2 1/2 inches long and dab small bits of hot glue at the end of your ribbon and fold each corner over a bit.  Put a dab of glue in the center at the top and fold the top over.  Do the same for all 12 petals.
Once you have them all done cut out a small felt circle and start placing them on there with small dabs of hot glue.  I folded the ribbon back on each side too create a pleat or so (see below.)   Glue 6 of the petals on.  Now for the next layer of petals just start gluing them on in the same manner as the first layer but overlaying in between the first layer.   
For the center of the flower just take a strip of ribbon and folded it half.  Run a loose running stitch on the edge of the folded ribbon and gathered it up.  Next start rolling it up to form a bud or small flower in the center and use a needle and thread to stitch the bottom of it to secure it.  Its hard to see in the picture because of the black ribbon.  After you have made your center just apply it to the center of the petals with some hot glue and your flower corsage is ready!
 Here is the finished flower...I attached it to my purse that I made
You could also pin it to a sweater...
You could also attach it to a necklace!  I just ran the small safety pin through the chains and connected them.

ENJOY!

Saturday, September 4, 2010


It's a W-R-A-P

I made this a couple of these loopy and frilly fabric wire initials to add to the outside of my friends baby shower gift and one for my niece for her bedroom.  


To form the cursive letter I used paper-wrapped floral wire that I found at Joanne's and shaped them into the letters. I cut scraps of colorful fabric into 1'' strips.  I attached one end of the fabric strip to the wire letter with just some hot glue and started wrapping until the letter was covered.  I ended up wrapping mine twice to make it a bit thicker.


Once you have them wrapped with fabric you can start to add the embellishments.  I used other scraps of fabric to make little bows and to attach the two pieces together and added some fabric flowers.  You could also wrap pieces of yarn or two for decoration and glue on charms, artificial butterflies or other embellishments.  The possibilities are endless!  I just used what I had on hand.


These were super easy and fun to make.  I love adding homemade items to gifts given it that special touch!

Friday, September 3, 2010

Fall Topiaries

I just love topiaries but let's face it, they can be rather expensive and or plain.  I had some left over fall decorations that I picked up last year and decided I would make my own.  


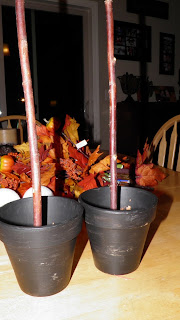
I painted the pots a light beige and then put a layer of crackle medium over them.  Next I painted the pots black and then rubbed a little bit of stain over them to darken up the beige a bit.  I used a stick and cut it into two pieces and then glued them into some styrofoam blocks I already had.  I covered them in moss as well as the balls on top.


I started sticking some of the leaves and other items in the styrofoam and then used hot glue from time to time to get the leaves just where I wanted them.


Here they are finished!  I decided not to glue the balls on top of the stick so that I can take the other styrofoam balls and add Christmas decorations to them maybe...same pot and stick but just change out the tops and the leaves on the bottom out for Christmas!


These turned out great and cheaper than the store versions!

Monday, August 30, 2010

Candlestick

I had this candlestick that I wasn't using and it was stained a dark brown but it was in need of an update.  I gave it a layer of black paint (my signature color!) and sanded the edges a bit.
Next I sketched out a design...

and started painting!  I rubbed on some antique stain and finished it up with some varnish...
I think it turned out rather cute I might say!
Related Posts with Thumbnails